CLICK HERE FOR FREE BLOGGER TEMPLATES, LINK BUTTONS AND MORE! »

Monday, February 14, 2011

Happy Valentine's Day!


So it's Valentine's Day today, and I thought I would share with you a simple and lovely dessert that anyone could fall in love with:


Mini Cherry Cheesecakes
The recipe I found the other day while browsing Bakerella's site and thought it would be the perfect addition to our family Valentine's meal that we had last night. Here's a breakdown of the super easy recipe:

2 pkg. (8oz.) cream cheese, softened to room temperature
3/4 cup sugar
3 eggs
1 Tbsp vanilla
1 Tbsp lemon juice

Mix.

vanilla wafers
2″ aluminum mini baking cups
Cherry Pie Filling

Place a vanilla wafer in the bottom of each mini baking cup.

Bake at 350 for 15-20 minutes, cool and then top with cherry pie filling.

Tips:
-When the recipe calls for "room temperature" cream cheese, you might want to slowly warm it in the microwave at 50% power, or let it sit out for awhile to make sure it's extra creamy and soft or your cheesecake mixture won't mix very well and be chunky.
-I just used whatever foil baking cups the store had, they fit my muffin tins, but this recipe is actually for "mini" cheesecakes, but I just cooked mine a little closer to 20min, and it made 24 instead of this recipe's intended 48. But who really wants 48 of these devilish things just hanging out at your house!!

So go ahead and try this recipe sometime! If you are a cheesecake lover like me, you will find any excuse or holiday to make/eat/devoureverysinglemorsel.......

Okay, you get the point, happy baking!


Sunday, February 13, 2011

Fun Finds!


Today's Fun Find is something one of my dear friends just found that I thought I would share with you because it is all about felt! Check it out here at Modern Kiddo . It shows you where you can find patterns to make your own felt food for your little ones, and also a few links to etsy where you can purchase pre-made felt food. Some of this play food is absolutely adorable!!


Saturday, February 12, 2011

Fun with Felt!

In 2009 when I found out I was pregnant with a girl, I was soooooooo excited!!! I had spent 5 years with a little boy, digging in the dirt, watching him eat his own boogers, and watching episode after episode of Thomas the Tank Engine and Bob the Builder.

Needless to say I was certainly ready to girl it up for my daughter's nursery! I was on a tight budget, so I figured I would decorate with felt. Felt is slowly becoming one of my ultimate faves, it is super super cheap, and you can get it by the yard at the fabric store or by the square at places like Wal-Mart. And you don't always have to use a sewing machine or even sew at all, it works really well with craft glue.

The supplies I used for this project:

1) Felt by the yard (brown and green)
2) Felt squares in bright colors
3) Scissors
4) Tacky Glue
5) Pipe Cleaners
6) Double sided foam tape - to adhere to the wall
Optional:
Sewing Machine (only for the tree below, not required)
Hand-sewing needles and thread

My inspiration was a piece of scrapbook paper I found while taking a trip to Michael's (you will see the picture below), and I just decided to create some simple shapes with felt to adorn her walls:

A little blue bird

I made the tree on my sewing machine, used polyester filling, and then hand -sewed the flowers onto the tree. In addition to the two little bluebirds I made two butterflies.


My Mom even got in on the crafty-ness and created some custom art for my daughter's room!


And here is the inspiration, a piece of scrapbook paper by Imaginisce called Twitterpated Hey Foxy.

So if you have children, felt is an easy and fun way to create something custom to decorate their walls. You can literally create whatever your mind can imagine, and if you totally screw up, you won't be throwing away a small fortune :)


Friday, February 11, 2011

Cute Cute Cute!


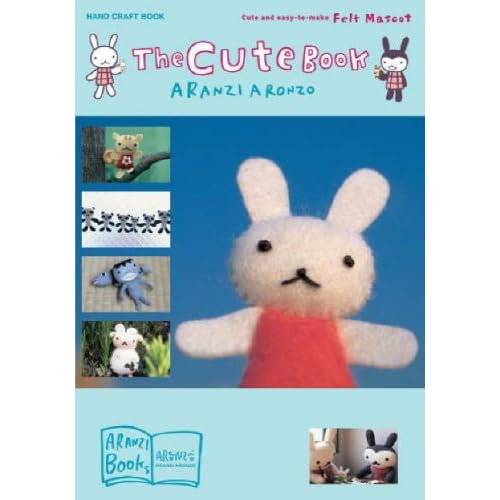
I absolutely love anything Japanese! Even my husband was born in Japan (but unfortunately he's not actually Japanese, it was a military base). I also love sewing, but not anything that is too incredibly difficult, I'm fairly a newbie and self-taught for the most part. A couple years ago a friend of mine introduced me to this cute craft book by Aranzi Aronzo called The Cute Book .
If you aren't that great at sewing, and you happen to have felt (which is one of the most inexpensive things you can buy at the fabric store!) you can make these cute little dolls!

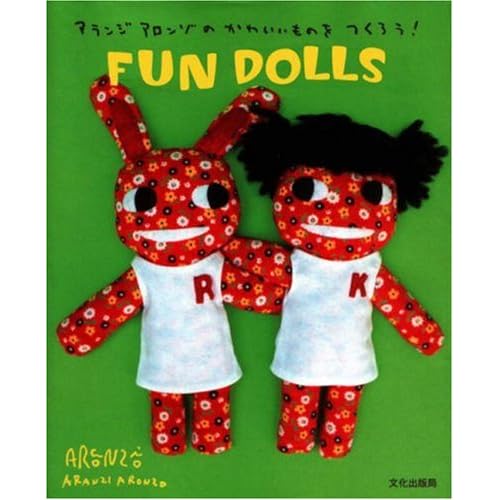
I made a panda and a lizard soon after getting the book, and then found out the author has even more books, including Fun Dolls.
This book is even more amazing, and it really is seriously CUTE! The Fun Dolls book has patterns for larger dolls and gives you the option to work with some different fabrics, like fleece, which are super easy to work with for beginners like myself!

I had the opportunity to make two of these cute dolls for a couple of cute little girls a couple years ago, check it out:


So if you are looking for something easy, fun, and kid-pleasing (although I won't tell if you make a billion pandas for yourself!) then these books are a MUST HAVE for your Crafting Library. You can go back to them time and time again for really unique gift ideas :)

Thursday, February 10, 2011

Fun Finds!

I think I have come to realize I use far too many exclamation points when I write. If only the internet could just capture emotion through my keyboard.....


Anyway!! (teehee)

I find fun stuff online all the time. It's one of the benefits of being at home most of the day. I would like to share these with you.

For instance, check out this etsy link for a sampler of AWESOME fabric! (click on the image to see the other fabrics in the sampler)


Isn't it great?! I love the vintage yet modern feel to it. What would you make with it? I never know what to make with fabric, I usually just end up making pillows. I need some new fresh ideas :)

I tried it!


I gathered up my supplies and some plain t-shirts and tried the craft project I poster earlier.


Here are my supplies ready to go:

Now, I realized that I didn't have the EXACT supplies that were mentioned in the blog, but I figured I was fine. Turns out I was not!!!

Words of wisdom - if you are going to try this this weekend USE THE SAME FABRIC PAINT she uses on the blog. Also buy yourself one of those paint rollers. And another tip - go for white or light colored t-shirts! These two were the only ones I had on hand.

After trying to do my shirt the way that the directions told, I figured out that the paint was just not transferring thick enough to show up on my shirt and the detail wasn't right. I then improvised and decided to do more of a stenciling approach to save my shirt. Instead of painting the doily and pressing it, I just put the doily down onto the shirt in one spot and painted in the negative space and some around the edges (think of it like making a negative of the original design). The results are as follows:


So, as you can see, not exactly as easy as I thought it would be, but you will never know unless you try! I would say it's not a total disaster, and I will probably wear my shirt along with my daughter on Valentines day. And I didn't really lose any money, I already had the shirts, the paint, and the brush, the doilies I bought today for $1.75.

The lesson for today is this : Who cares if your stuff doesn't turn out perfect! Just try it if you want to try it!!! You will be surprised how much you learn from every crafting experience :)


Valentine's Day Craft

Okay, so I know my first actual crafty post probably shouldn't be something that I haven't actually made, but hey, I intend to try and make this on the weekend if I have time and some plain t-shirts. We've been iced/snowed in a few times and I've been too busy to get out and get the supplies.
But really, this craft looks fun, and easy, and SUPER CUTE!! One of my friends has already tried it with great success, so if you are looking for something unique to make for your sweeties check out this craft that I found:

HEART DOILY TSHIRTS!


You can find all of the instructions on The Artful Parent Blog .

And if I ever get around to making some for me and my daughter this weekend I will be sure to post pictures!